ALT (Altoids Longwire Tuner)
Updated with new manual information 7/28/05
 My
most recent project during the Tuesday night 4SQRP
builders group was the ALT Tuner, designed by Steve Weber KD1JV and offered by Hendricks
QRP Kits. This kit was given to me in April by Doug Hendricks, KI6DS, during
OzarkCon 2005 in Joplin, Missouri, but I didn't have time to built it until this
summer. It sells for $25 plus $4 shipping. To be fair, I did give Doug a book or
two of mine in exchange. Hope he liked them as much as I like this tuner.
My
most recent project during the Tuesday night 4SQRP
builders group was the ALT Tuner, designed by Steve Weber KD1JV and offered by Hendricks
QRP Kits. This kit was given to me in April by Doug Hendricks, KI6DS, during
OzarkCon 2005 in Joplin, Missouri, but I didn't have time to built it until this
summer. It sells for $25 plus $4 shipping. To be fair, I did give Doug a book or
two of mine in exchange. Hope he liked them as much as I like this tuner.
I have to admit, I was pretty skeptical when I began building. I have never
had much luck using longwires. In addition, my Icom 703 doesn't like longwires
-- it has to have a 50 ohm load. But, I thought I were learn some things from
building this kit, and indeed I did. The good news is that the kit does
everything it promised to do, and more. It was also relatively easy to build (if
you've ever wound a toroid), and my total construction time was a couple
of hours. This was stretched across a couple of builders sessions, since we tend
to talk more than we build at these events. In all, I can recommend this kit,
especially if -- like me -- you've had little experience with long wires. My
complaints are minor ones and should not be interpreted as saying this is a bad
kit. In fact, it is a very good kit. That said, here's my observations, based on
the instructions that came with the Hendricks kit. I understand that the
instructions on KD1JV's website are somewhat different: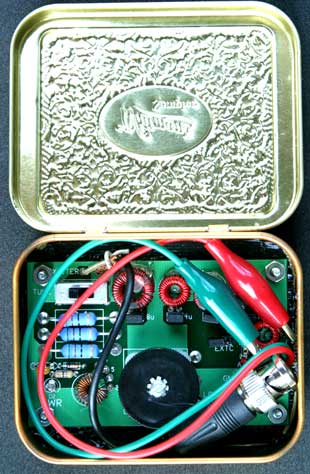
1. I had enough magnet wire to wind all five inductor toroids, but came up a
few inches short when winding the transformer. I ended up "borrowing"
some wire of the same size from Joe, WØMQY. Seems like we all borrow quite a
bit of odds and ends from Joe. He has an amazing collection of stuff and is very
handy in a pinch. A few more inches of magnet wire would be helpful for novice
builders like me who are sloppy winders or otherwise have trouble making
efficient use of magnet wire.
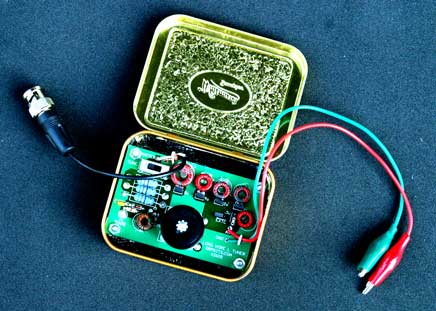
2. The plain Altoids-type case that came with the kit is not deep enough for
the lid to close completely when the tuning dial is attached to the top of the
tuning cap. It is also a tight fit getting the BNC connection and the alligator
clips inside. I solved this problem by using a Whitman Samplers tin, which is
about the same size as the ubiquitous Altoids, but is a little deeper.
3. It was necessary to drill some 1/16" holes in the circuit board to
provide strain reliefs for the alligator clips and RG-174 coax. I would have
preferred not to have drilled extra holes in the board, but this is not big deal
-- except for finding the right sized bit in my tool box. I used some scrap
hookup wire for the strain reliefs, but bigger holes would have allowed the use
of cable ties.
4. Be sure to hot-glue the toroids on the board. If you don't, they'll flop
around in the field, which is what you don't want. Also, as you build, I would
suggest checking the continuity on each toroid as you solder it to the board,
just to make sure you've properly removed the enamel from the ends of the leads.
Also, be sure to follow the instructions about heaving continuity between ANT
and the left pin of short block L1.
5. The operating instructions need amplification for folks like me who must
have things explained several times before I understand how to operate the
tuner. In fact, I believe the Hendricks instruction is in error when it says,
""You want to use as little inductance as possible to get a match. So
start out with the shorting block on L5, and the shorting blocks on L1, 2, 3,
& 4 only attached to 1 pin (great way of storing the shorting blocks)."
Well, this is backwards. The shorting blocks remove the toroids from the circuit
-- in the configuration mentioned, you have the inductance of L1-4, with L5
shorted out. So, start out with only one toroid left unshorted, and then add
(short) toroids as necessary. The lower your band, the more toroids you will
probably need.
6. The instructions need to instruct you to switch the tuning bridge out when
ready to operate. The tuning bridge is necessary to be in the TUNE position
while you are seeking a match. You'll now you have a match when, while
transmitting, the LED goes dim or completely out. If you don't switch the bridge
out, those three 51-ohm resistors will soak up power and reduce your output by a
couple of S-units.
7. If you're having trouble finding a match, try removing or adding the Extra
C jumper near L5. This engages/disengages the other half of the tuning capacitor
and gives you a little extra range.
Note:
This review was written using the prototype manual. Here are the rewritten
operating instructions from the revised manaul:
"Operation:
I use a piece of wire 51 feet long for my long wire, and a piece 16 feet long
for the counter poise. You want to use
as little
inductance as possible to get a match. So start out with the shorting block on
L1,2,3&4. This will bypass those coils,
eliminating
them from the circuit. Take the shorting block on L5 and pull it off. Put it
sideways on 1 pin, this is a great way to
store the
block so you won’t lose it. Now, L5 is in the circuit with .5uH of inductance.
Tune for a match which will be
indicated
by the LED going out or getting very dim. If you don’t get a match, then add
L4 by pulling off the shorting block,
and
retuning. This will put L4 1uH and L5 .5uH in the circuit. Keep trying adding
inductance until you get a match. The
LED will
dim or go out when you have a good match. Also, remember that you can lower the
capacitance of C2 by pulling the
shorting
block. Try that if you can’t get a match. Have fun and enjoy."
8. Be sure to use a 51-foot wire, per the instructions (this goes to the red
alligator clip), and get it as high off the ground as possible. Also use the
16-foot counterpoise (goes to green alligator clip). You can use just about any
type of wire, but I found that 24-gauge speaker zip wire worked well. Just be
sure as you unzip it that you keep it taught and not let it get coiled up or
you'll have a heckuva time untangled the resulting "bird's nest."
RadioShack has a 75-foot role of this speaker wire (stock number 278-1509) for
$3.69 cents. Unzipped, this is 150 feet. More than enough for the ALT long wire
and counterpoise. Also, you get a nifty reel to keep your longwire on.
9. If you are using a radio like my favorite, an Icom 703, you will also need
a 259 to male BNC adapter to connect to the RG-174 (this is RadioShack number
278-121 and retailed for $5.29). If you don't, the radio won't see the proper
impedance with the bridge switched out. I originally tried using alligator clips
to attach the BNC to the 239 jack on the back of my 703, but this was a very bad
idea -- it was fine with the bridge in (considering those three 51-Ohm
resistors), but with it switched out the SWR was off the scale and transmitting
would have been a risky affair. But with the adapter, the ALT Tuner matched
perfectly with the bridge out. My thanks to Joe, WØMQY, for suggesting this
simple fix.
10. Final results? Matches on 40, 20, and 10 meters that were all better than
1.25 to 1, obtained using the tuning function and the LED dip indicator. I
also used an MFJ 259-B to check these, and on 40 meters the SWR needle dipped to
zero and the impedance hovered at 50 ohms. Also, while trying different
combinations of inductance, I knew I was getting close when the receive audio
became dramatically louder, as one would expect with a tuner. The frequencies I
tested the tuner on were 7.285, 14.285, and 28.400 MHz, and I made contacts on
all. These were not DX, but I got 5/9 reports. Also, this was with the internal
tuner in the 703 turned OFF. Not bad for a $25 MULTI-BAND tuner, and
especially one that will fit -- along with your antenna -- into your pocket,
with no batteries required. As a final note, I would like to know how much power
the ALT Tuner is rated for. Five watts? Ten?
Although a better manual and clearer operating instructions are needed, I strongly
recommend this kit. It is one of the three or four QRP kits I've had the most
fun with. Hats off, Steve and Doug.
72, Max KCØMAX